Monday 17 August 2009

Konami 052535 Joy !

Well the scraping and squinting finally bore fruit. I managed to meter out the film resistors and rounded them to the nearest commonly available values. The transistor i managed to destroy whilst removing it but i just replaced it with a common NPN BC548 and it seems happy enough.

For anyone wishing to fix or build a replacement this pic should help. The grey boxes are the 0 Ohm links.


I ended up fixing the original hybrid rather than building a replacement. It works a treat .. yay !

Thursday 13 August 2009

Konami 052535 Woes

As a break from the current crop of Bubble Bobble fun ive got another project on the side, namely a poorly Konami Sunset Riders.

The PCB was purchased knowing that it had a faulty custom on the RGB output stage causing a complete lack of red onscreen. The custom is a small 9 pin hybrid which intact looks like this.


Unfortunately the one removed from my PCB has been flexed and has cracked vertically. So armed with a scalpel and some patience i have removed most of the epoxy and so it now looks like this.


As you can see it contains a transistor, 4 surface mounted zero ohm links (one was cracked by the damage and 13 film like resistors printed directly on the wafer like pcb.

Time to break out the meter and start squinting methinks :)

Friday 31 July 2009

Bootlegs #5 and #6

Another couple of variations have popped up on my travels.

Bootleg #5 (Thanks to Corn for the pic)

First is what i will call Boootleg #5. Another nice JAMMA looking single board design VERY similar to #4 but with enough small changes to warrant its own pic.

Small things such as the pair of unpopulated GFX roms and an IC missing where the "10" column marker is on the #4 bootlegs silkscreen are some. Those are just changes to the population of the parts that the bootleggers tweak along the process but they also made some minor board changes as can be seen by the larger power traces that run up where the A-T row marker silkscreen is on #4.


Bootleg #6 (Pic from presumably a won auction. By Cauterise / Arcadeotaku)

Another double board boot, space for but missing (as usual) the PS4. Looks to have a 56 way edge connector but has also been coverted TO JAMMA ?. Maybe earlier bootlegs didnt conform to the JAMMA standard ?


Friday 17 July 2009

Bootleg #4

Found another type of bootleg, I will lable this one as Bootleg #4

Bootleg #4

Quite a nice single board type but no attempt to provision for the PS4.


Pretty easy to see where the boards would be split, straight down the second column of silk screened row markers.

Friday 10 July 2009

PS4 Sum Error

The PS4 Microcontroller on a Bubble Bobble board turned out after eventually being decapped by the MAME team , to be a Motorola MC6803u4.

Its datasheet can be downloaded here for anyone who might be interested:

http://www.megaupload.com/?d=1S5VE22C

A suitable disassembler and corresponding assembler which can be used to work with the MCU can also be found here:

http://www.techedge.com.au/utils/dhc11.htm

An easy way to start experimenting is to use the MAME emulator that supports the dumped MCU. If you extract the bublbobl romset into a corresponding folder within your ROM folder, you can make modifications to the a78-01.17 file.

This brings us to our first hurdle. Any attempt to modify the stock binary dump and you will be greeted with the following screen on attempting to start the game.


Ah! A cheeky checksum is afoot.

Peeking at the disassembly, we find the following snippet which is called early on in the flow of the code.


A couple of pointers to this code.

The ROM in a 6803u4 resides from $F000-$FFFF.
The routine at LF1DB is one that writes to the shared Z80 RAM on the BB PCB. The byte to write is stored in the B accumulator, the address is in the indeX register.

What the routine does is set the index register to point to the start of the ROM and clears the A and B accumulators ready for use. It adds 2 bytes of the ROM to the double byte accumulator D (which in essence is just the pair of A and B accumulators) and increases the index register by 2, then loops. Once the entire ROM has been added up , the 2 calculated values are written to consecutive locations in the shared RAM. These locations are checked by the main Bubble Bobble program code, if they are not both $00 then we get the error screen.

An easy fix to this from our point of view is to just NOP out the "addD 0, X". The D accumulator never gets changed after its initial clearing and will therefore always equal $0000 after the loop.

Give it a try if you feel like it. Change the date in the text string towards the end of the binary to simulate the error. Then if you NOP out the command by changing the 2 bytes at offset $27F from E300 to 0101 it should then run fine.

Saturday 4 July 2009

Differing types of PCB

I guess a good start might be to identify the different types of PCB (both original and bootleg). So here goes.

Original PCB (Thanks to Tormod Tjaberg for the pic)


Notice the original PS4 with the Bub silkscreen on it, a sure fire way to identify original boards.

Bootleg #1 (Thanks to Invzim for the pic)


( Not sure why but Blogger keeps rotating the picture :( )


Has a JAMMA compatible pinout.

Blank space for the PS4. According to Invzim (the owner of this PCB) although it has a space designated for the MCU, the majority of the pins are NOT connected.


Bootleg #2 (Thanks to JROK for the pic)


Pinout looks identical to the original Taito. Is missing the seperate power connector though.

Space for the PS4. Looks as thought the entire PCB is a full copy of the original.

Bootleg #3


Can anyone help with this one , apparently there is a version which has a 68705 MCU onboard ?

Friday 26 June 2009

Bubble Bobble Bootleg Bonanza

Let me introduce my first little project. It's a bit all over the shop but I'll try to cram it all in.

Back in the 80's a company called Taito released one of , if not THE most popular arcade platformer of all time. Bubble Bobble. Because of its popularity it became an obvious target for one of the more shady aspects of arcade gaming .. bootlegging.

From a bootleggers point of view, getting a game working 100% identical to the original is the ideal but no where near as important as getting it to work closely enough to sell. The amount of time where its possible to make a decent profit from selling a bootlegged copy is relatively small so shortcuts are taken.

Knowing this, the Taito engineers included on the board a special custom MCU. Labeled with their own custom markings the JPH1011P or "PS4" shared an on board RAM chip with one of the Z80 processors on the board , modifying various aspects throughout the game. It was of course protected so that once programmed it's internal programming could not be read back out.


Cute.

The bootleggers bypassed the need for the PS4 in a couple of ways.

One set "blackboxed" the PS4. By this i mean they ran the original board and monitored what parts of the shared ram it was reading and writing to. They then created their own version of the PS4 in a programmable part available at the time, a Motorola 68705.

Another set of bootleggers modified the Z80 program entirely to disable all checks for the PS4 and recreate the functions of it within the Z80 code itself. This type of bootleg board (to me at least) seems to be the more common. One other aspect of this type of board (which is what this whole idea leans on) is that it is layed out in most cases EXACTLY the same as the original Taito PCB.

Unfortunately what both sets failed to do is mimic the PS4's behaviour exactly, hardly surprising with some of the functions only being triggered by obscure events or only after extended periods of playing time . Because of this, certain aspects of the game such as the randomness of the EXTEND bonuses, enemy movements or the clock bonus item do not work as expected.

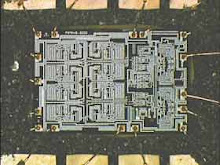
The MAME arcade emulator for a long time had incomplete emulation of the game for the above reasons until recently they were able to decapsulate and extract the program contents of the PS4. This resulted in perfect emulation as well as giving the public a peek at the original code.

So finally ... my idea.

I'm thinking that it should be possible to recreate a compatible version of the PS4 using a modern micro controller such as a PIC or AVR. It could be used as a fully functional replacement to revive an original PCB that has a faulty PS4 but as an eventual goal i would like to be able to upgrade compatible bootleg pcbs to function exactly like an original.

Pointless ... maybe
Useful ... only to a select few
Tons of tinkering, finger burning, code hacking fun .. hell yeah :)